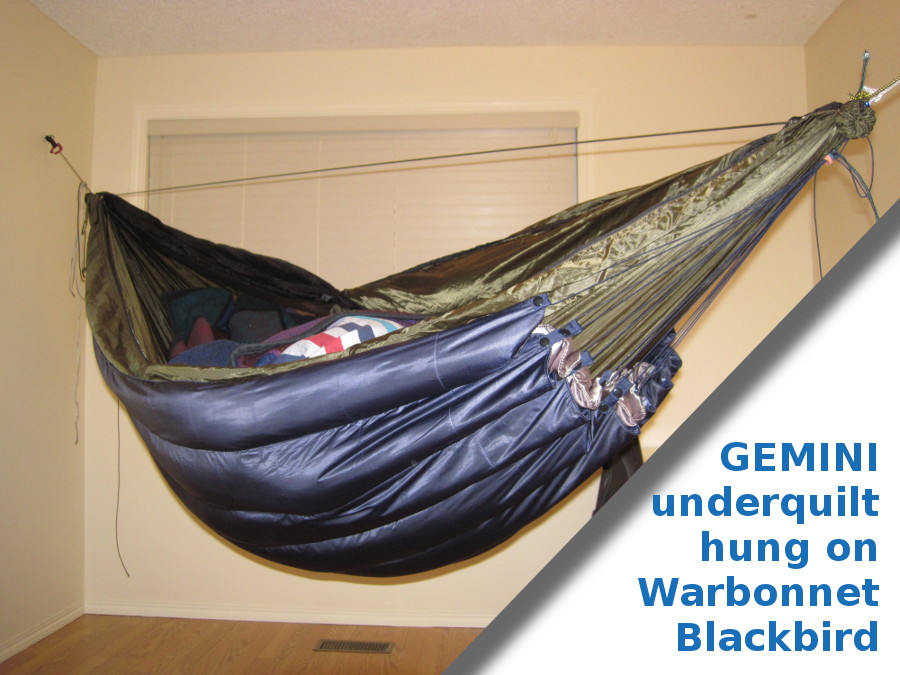
The GEMINI Hammock Underquilt
How to make a DIY, no-sew, all-season, convertible, down underquilt for $65 and love the results.

Converts to match any season:

About
This do-it-yourself hammock underquilt design is meant for persons new to hammock camping that need an easy and affordable underquilt that actually works. It is made from 2 down blankets sold at Costco or Bed Bath & Beyond and converts into 3 different modes to match any season. It puts the best ideas on the topic into one project that is easy, accessible, affordable, and highly effective.
This design totally out-competes entry level alternatives like the Poncho-Liner Underquilt (PLUQ), sleeping bag conversions, SnugPak underblankets, and imported junk you find on Amazon.

Design Features
- No-Sew. Absolutely no sewing required. It literally snaps together!
- $65. Includes all off-the-shelf materials and tools.
- Perfect Shape Conforming Fit. Say goodbye to cold spots! Innovative elastic clew suspension keeps it snug all night no matter how you lay in it.
- Convertible. Converts from a Summertime two-piece top+bottom quilt set to a triple-layer Winter underquilt.
- Modular. Built from two separate blankets, you can swap them out or layer them together.
- Triple Layer. Up to 5" loft (2" at pressure points)
- 650+ Fill Power Down. Packs down smaller than synthetic quilts.
- Stackable. Combines with other quilts with no extra effort.

Design Philosophy / Pros & Cons
There are lots of DIY Costco underquilt conversions already out there. This design attempts to put together some of the best ideas on the topic and make it easy for persons just getting into hammocking.
This design is meant to be affordable, easy, and high-performing. To achieve this, we use off-the-shelf items and inexpensive tools, a no-sew snap-together design, triple-layered construction for warmth, and an elastic clew suspension to avoid fiddly adjustments and cold spots.
Everything is a trade-off, though. This design weighs in at a little over 2 pounds. It won't qualify as "ultralight", but at it's price-point it's nearly unbeatable. Also, don't expect 900 fill power down, dry down, or waterproof materials you might expect from pricey cottage vendors. I love pricey cottage vendors, but if you can't afford that, then this is your next best thing.
This design is also meant to be convertible. Because it uses two blankets layered together, you get some sweet options at no additional cost:
- Summertime / Home Use. One of the two blankets converts to a light top quilt. Together, you have an ultralight summertime sleep system. I personally get more use out of this configuration around the house. I keep the underquilt on my indoor Brazilian hammock and use the top quilt for lounging on the couch!
- Shoulder Season. For Spring and Fall, the two blankets are layered together with offset baffles to cancel out the seams. You end up with a warm underquilt that wraps the entire underside of the hammock in puffy down.
- Winter Season. The inner blanket snaps back into a 35" asymmetric sash to provide you with triple-layer downy goodness down under, right where you need it most!
Construction

Construction Guide
Download and print for quick reference when making your quilt. Prints on standard 8.5x11 in color.
True to it's mythological name, the GEMINI underquilt is made from two identical Costco down throw blankets. To make the directions more clear we're going to call these after their original Greek names: "Pollux" is the main underquilt, and "Castor" is the convertible secondary blanket.
Total estimated construction time for the complete set is about 6 hours.
Okay, let's build this bad boy...
Materials & Tools
You will need:
- (2) Down Throws. You want the 70x60 inch "Double Black Diamond" down throws from Costco or Bed Bath & Beyond. Typically $20 each in the store, more from scalpers on eBay. Do not get the 60"x50" knockoffs from other stores, as they are too small.
- (100ft) 1/32" Shock Cord. Get this is any color you like from Amazon. About $9. 1/16" also works, but do not use 1/8". I know you want to, but trust me.
- (3 yards) 1/2" Grosgrain Ribbon. Generally about $0.50 per yard at any fabric store. Any width from 3/8" to 2" will work, but 1/2" will match the width of the snaps.
- (1) KAM Snap Pliers. $15-20 on Amazon or I Like Big Buttons if you don't already have these. Get the set that comes with 100+ snaps unless you want specific colors. Once you own this tool, you will immediately find other uses for it.
2018 Update: KAM-compatible copycat import brands are starting to show up on Amazon if you want to save a few bucks. - (100) KAM Snaps. Size 20 is the most common. Usually comes with a pliers kit unless you wanted special colors. It would be advantageous to have two different colors of snaps when making the Castor blanket but not required.
- (1) Seam Ripper. These are as little as $2 retail if you don't already have one.
- (2) "Rings". Ideally, use mini keychain carabiners. Keyrings, descender rings, and S-biners also work fine. In a pinch, a soft shackle or cord loop.
Making "Pollux"

Rip Seams
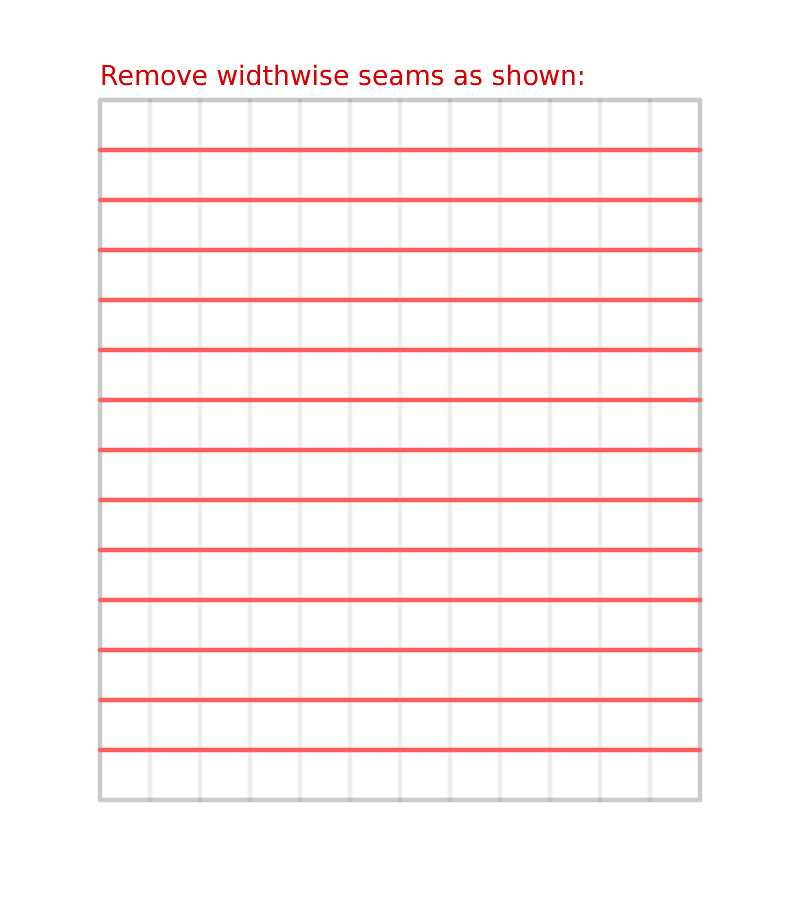
Each blanket is made of 12x14 5" squares. We are going to remove all of the short, widthwise seams. This will leave you with long, lengthwise baffles of down. Removing seams helps it loft much higher.
For n00bs: If you've never used a seam ripper before, listen up: Each seam has two sides. One side is a thread that loops in and out of the fabric. The other side is a straight thread that is captured by the loops from the other side. Find the side with the straight thread. Use the seam ripper tool to snip each square once at the seam and once in the middle. Use tweezers to firmly pull the thread straight out. Once the straight thread is remove, you will find the other half of the thread on the reverse side completely free. This should take you an hour or two. Put some music on, pour a beverage of your choice, and lets get to work.
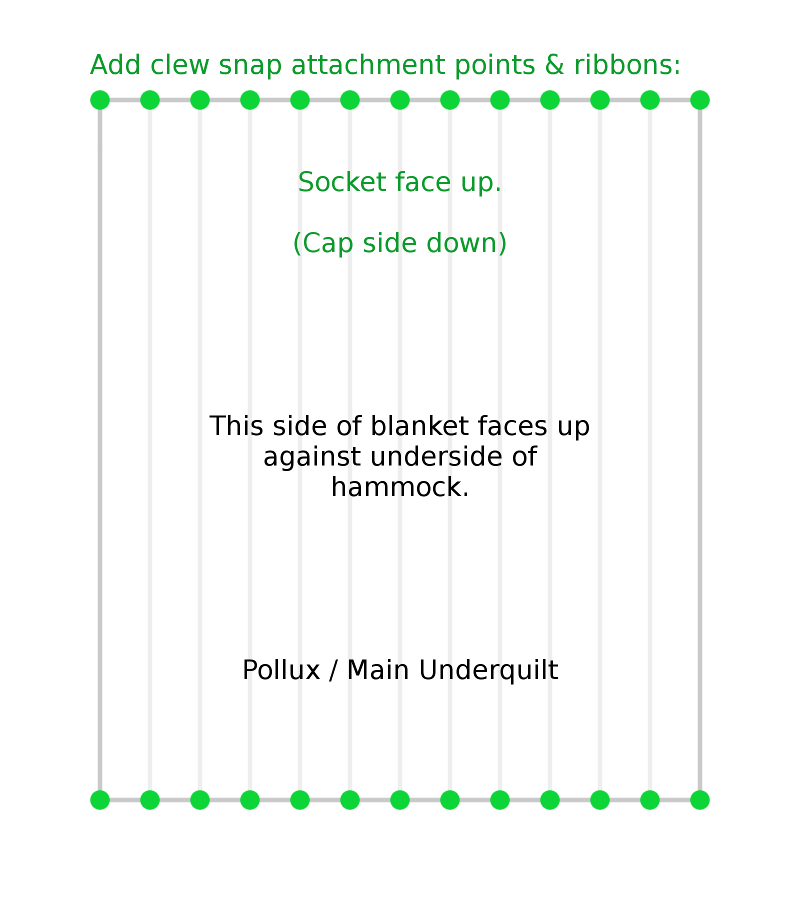
Clew Attachment Snaps
Next we are going to add the attachment points for the clew suspensions.
Cut your grosgrain ribbon into 26 4-inch segments. Use a candle flame to melt the ends. This prevents it from fraying.
Next, rivet the ribbons to the blanket at the corners and the top of each seam as you see below:


Make Clews
This part is easy. You need a board and two nails. Put the nails firmly in the board about 21" apart. Put your keyring or mini-carabiner on one nail.
Tie one end of the shock cord to the ring with a simple slip knot, leaving at least an 8" tail. Go around the second nail with the cord and back through the ring. Do this 13 times. Use light, even tension.
After the cord takes the final trip through the ring, make a temporary whipping to hold it together. Leave another 8" tail and cut the shock cord.
Make two of these.
Later, after you have tested the completed assembly, you can remove the temporary whipping and whip the two tail ends of the shock cord into a Western Country Whipping. Alternatively, you can weave them together with a Shouldered Sword Mat if you feel like being fancy.
Tip: Several users have found that the quilt shapes better if you leave the first and last nettles about 3 inches shorter than the others. This puts more tension across the edges of the quilt.


Notes on hammock size:
These directions are for a 10ft+ hammock. If you want to custom tailor your GEMINI quilt to a specific hammock, use the following chart for the best fit:
- 9 ft hammock: 15" clews
- 9-1/2 ft hammock: 18" clews
- 10 ft hammock: 21" clews
- 11 ft hammock: 27" clews
- 12 ft hammock: 33" clews
Attach Clews
For each side, take each loop of the clew (AKA a "nettle") and connect it to an attachment snap on the blanket. You should have 13 nettles hooked into 13 snaps.
Tie a 2-foot piece of any ol' cord to the end of the ring. Use this to tie to the hammock. Using this extra bit of cord gives you the option of adjusting the positions and tension of the quilt later.
Hang it up and try it out!


Making "Castor"
"Castor" is the secondary, inner blanket. Making Castor is much faster than making Pollux.

Rip Seams
Rip the short seams exactly the same as the first blanket. You should be getting good at this now.
Add Snaps
Add snaps as shown in the diagram. This is easy to mess up if you are not paying attention. I recommend you mark each spot with a sticker or piece of tape to show which is a socket or stud, face up or down.
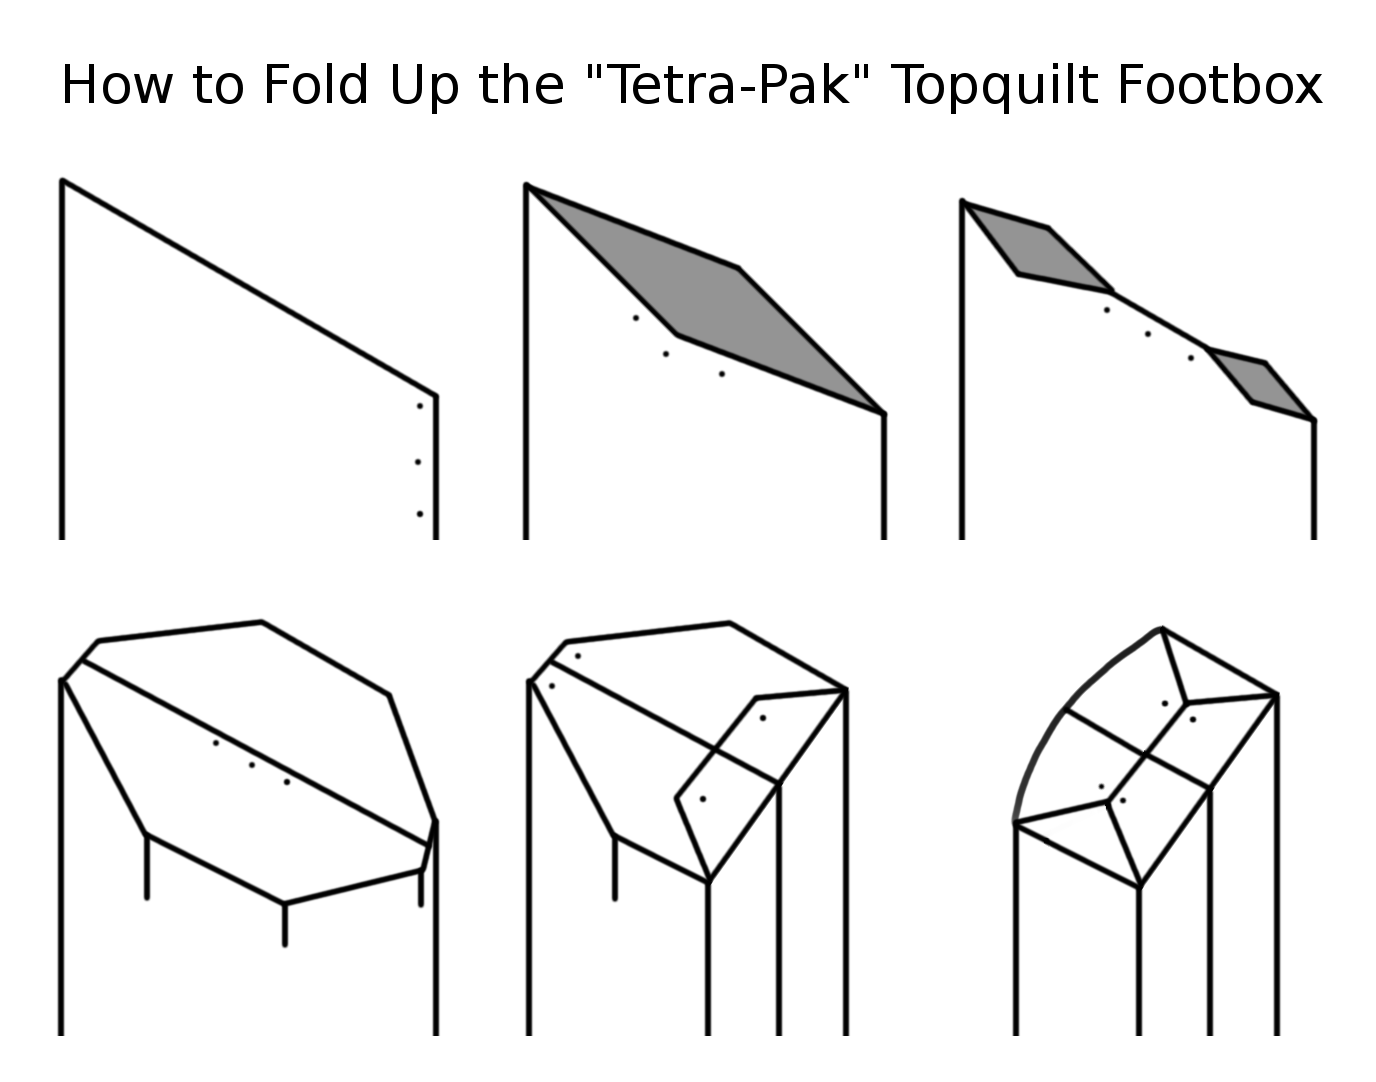
VERSION 2.0 UPDATE: v2.0 uses a "Tetra-Pak" inspired shaped footbox. The snap pattern for this is a bit more convoluted than the regular flat-seamed version 1.0 topquilt. If you want the old version of the Castor blanket, just use this snap pattern instead.
Optional Tip: Use two different colors of snaps to differentiate between the ones used for attaching the clews and the rest used for converting to a topquilt.

That's it. You're done. Now the fun part ...
How To Hang It
Summer Mode
Just tie the Pollux blanket up by itself and turn the Castor blanket into a standalone topquilt. The sides will snap together and the footbox should snap closed.
VERSION 2.0 UPDATE: v2.0 uses a "Tetra-Pak" inspired shaped footbox. Start by snapping the long edges together to form a tube. Snap the middle of the footbox together (3 snaps). Roll the bottom up (2 snaps). Roll the top down (2 snaps).
Tips for Summer mode: Unfortunately, we are dealing with a sewn-through design on a single blanket. This means that you may feel coolness along the seams under the hammock. To mitigate this, there are a couple of options:
- Skwooshing. Shake the down from the ends into the part that will be right underneath your back. Then reach around and "skwoosh" the blanket together accordion-style to make a condensed sash. This will help squeeze the baffles together and avoid exposed seams.
- Stuffing. Take any unworn article of clothing and stuff it underneath your torso between the quilt and the hammock. You don't need much. The light tension on the elastic clews will keep it together.
- Wear a Sweater to Bed. Or stuff it underneath.
- Underquilt Protector. This will keep a warm cushion of air around you by blocking the wind.
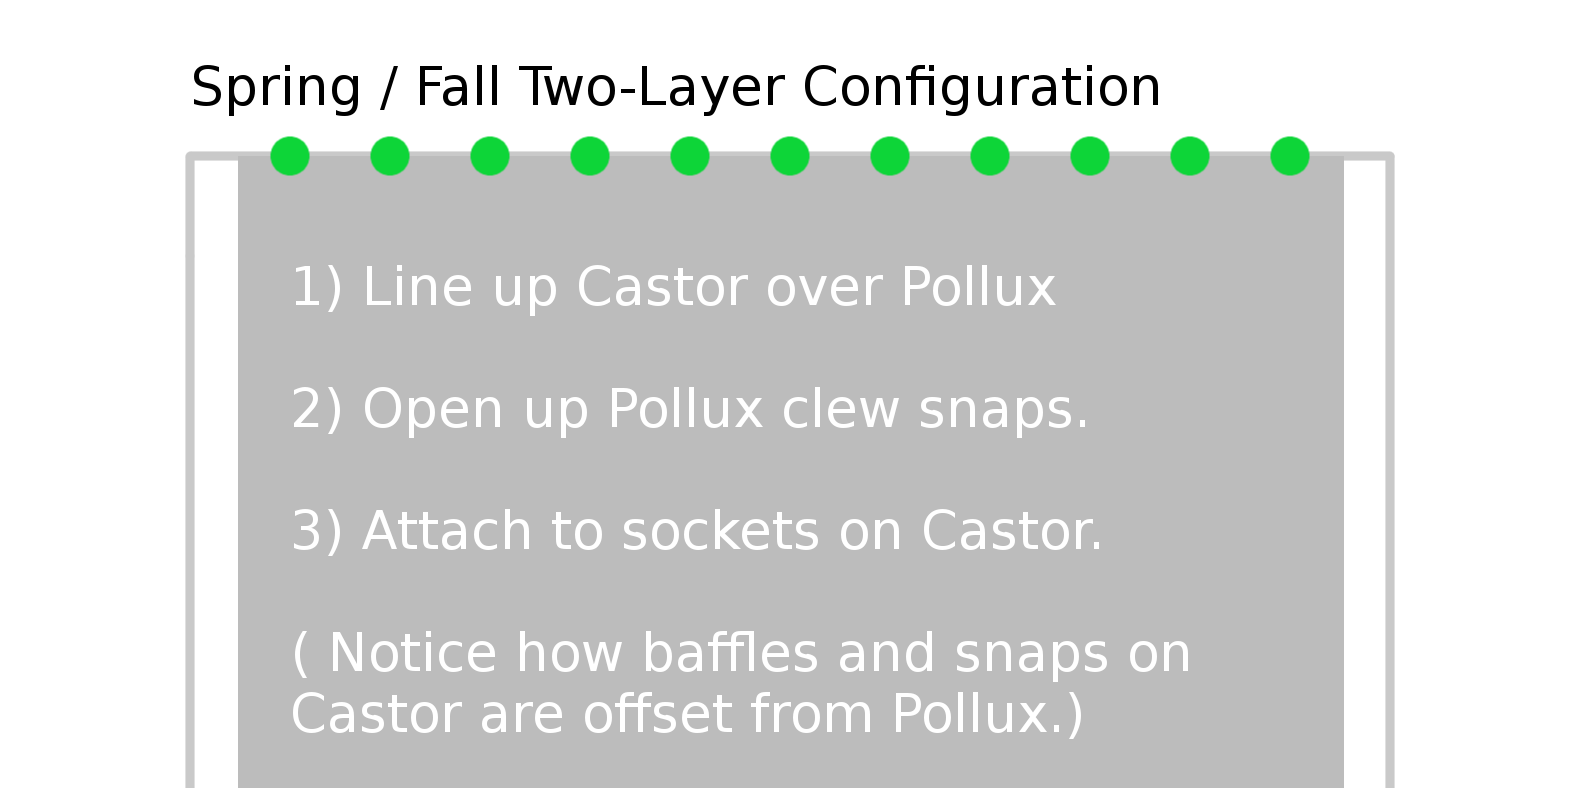
Spring / Fall Mode
Simply line up the blankets and connect the snaps from Pollux onto Castor, keeping the clew nettle captured underneath. That's it. The snaps on Castor are designed to offset the baffles on Pollux, so the two blankets create a great layering effect. Simple and effective. It's also a great width for side sleeping.
Note: The are 11 snaps on Castor and 13 on Pollux to create an offset. Center the blanket when joining the two together (i.e. skip the ones on the corners).


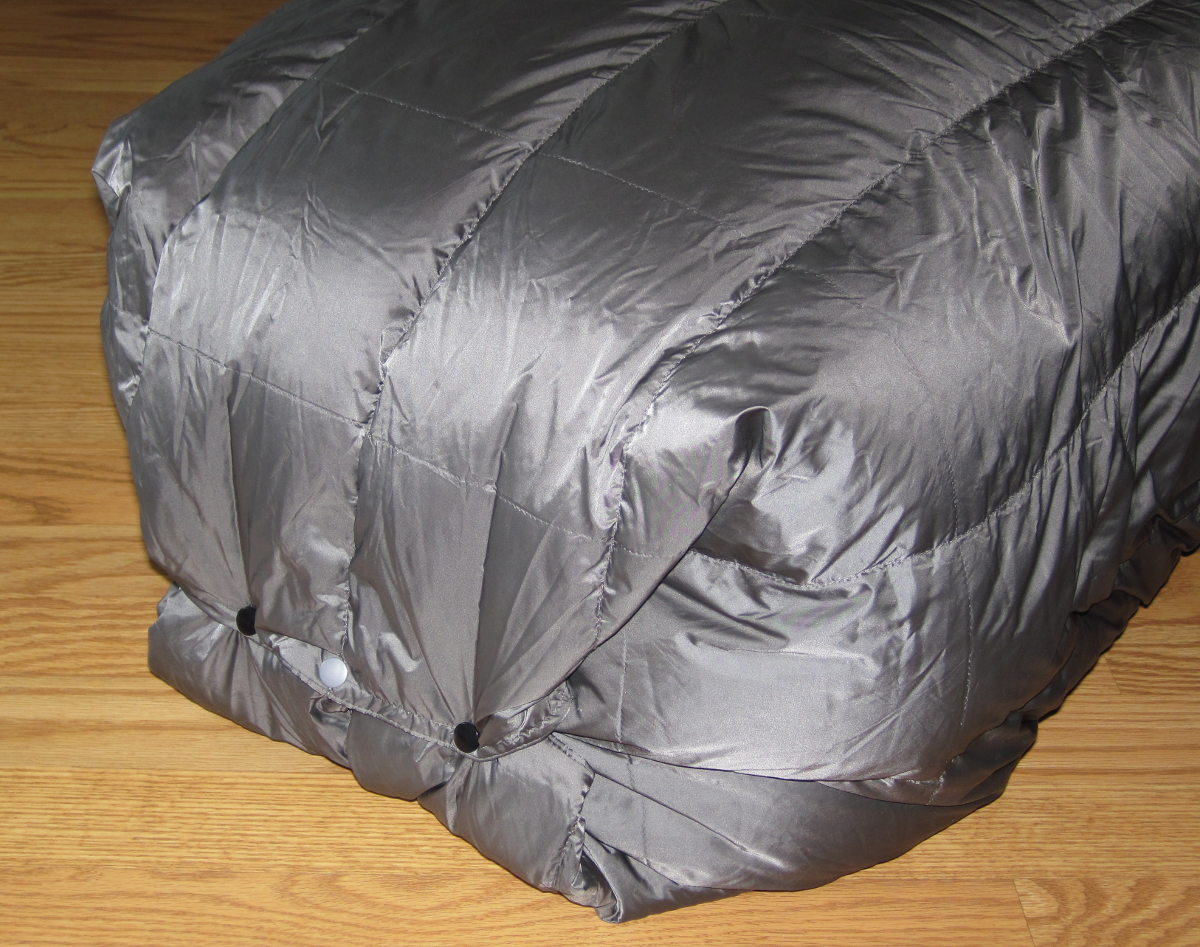
Winter Mode
Join the blankets together, as in Spring/Fall mode, but detach half of the snaps on Castor and fold the corners together to create a triple-layer asymmetric sash. You are now armored against the cold and you did it for cheap!


Additional Resources
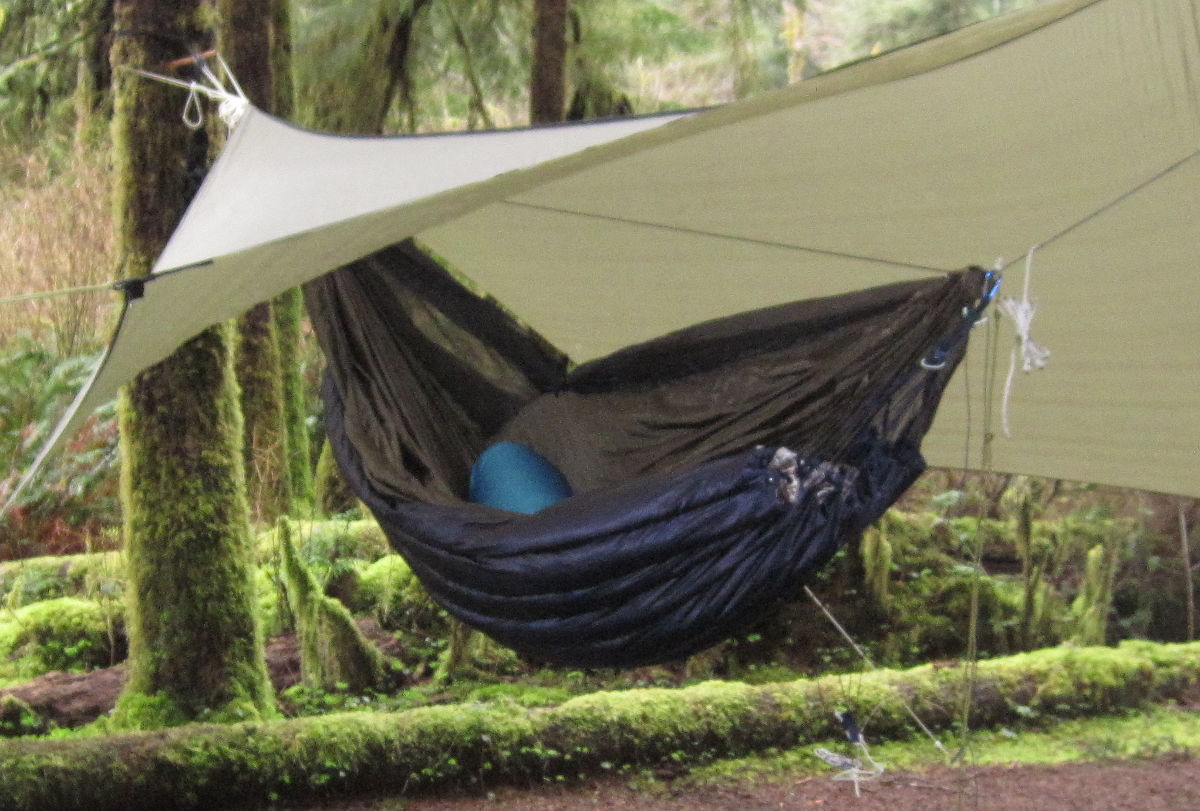
Visit the thread on HammockForums.net for more info and pictures of GEMINI quilts in the wild.
This design is based on research and development on elastic clew suspensions for hammock underquilts. You can read my original article on clew suspensions and subsequent discussion on Hammock Forums.
Check out Boone's video series on how to construct a GEMINI underquilt from start to finish
Going Further
Officially, this is a no-sew design. However, if you are willing to do a little bit of sewing, you can take the design further. Adding "faux baffles" to Pollux is an easy way to get rid of exposed seams and retain heat. Search hammockforums.net for "costco faux baffles" and you will find lots of instructions.
If you need to get fancy, you can finish your clews with a Shouldered Sword Mat instead of a whipping.
I recommend putting some kind of sock, sleeve, mesh, or rubber bands around the clews to prevent tangles during transport.
Add an underquilt protector to block the wind and retain heat even more.
Disclaimers
I want to be very clear about what I mean by "all-season" and "winter mode". I would feel comfortable taking this setup into the Winters I experience where I live in the Pacific Northwest. This is not intended for Arctic Circle extreme blizzard conditions, etc.
I am purposefully not putting any kind of temperature rating on any of these configurations. Everyone sleeps differently. I don't want anyone to blame me for going out into sub-zero temps and freezing.
Use good judgement, people!
Thanks
I didn't think of all of this on my own. Thanks to everyone who contributed ideas towards this design, too many to mention.
If you make this design and have feedback or improvements, please post something on hammockforums.net.
GEMINIs In The Wild:


Thanks for reading. Happy hammocking!